SPF Record Explained (2026): Setup, Syntax, Examples & Common Errors Fixed
Master your email deliverability! Our latest guide explains SPF record setup, syntax, and verification to keep your domain secure and your emails in the inbox
1. Introduction: Why SPF Records Matter in Email Security
If your emails are going to spam or not being delivered, one of the most common reasons is a missing or incorrect SPF record.
What Is an SPF Record?
SPF (Sender Policy Framework) is a DNS record that defines which mail servers are allowed to send emails on behalf of your domain.
When you send an email, providers like Gmail or Outlook check your SPF record to verify the sender. If the sending server is not authorized, the email may be marked as spam or rejected.
What Does an SPF Record Do?
An SPF record serves two main purposes:
1. Prevents email spoofing
It blocks attackers from sending emails that appear to come from your domain.
2. Improves email deliverability
Email providers use SPF as part of spam filtering. A properly configured SPF record helps your emails reach inboxes instead of spam folders.
Why Every Domain Needs SPF
SPF is now a standard requirement for sending emails.
Whether you're using:
- Business email
- Google Workspace
- Marketing tools like Mailchimp
Without SPF, your domain reputation and email deliverability can suffer.
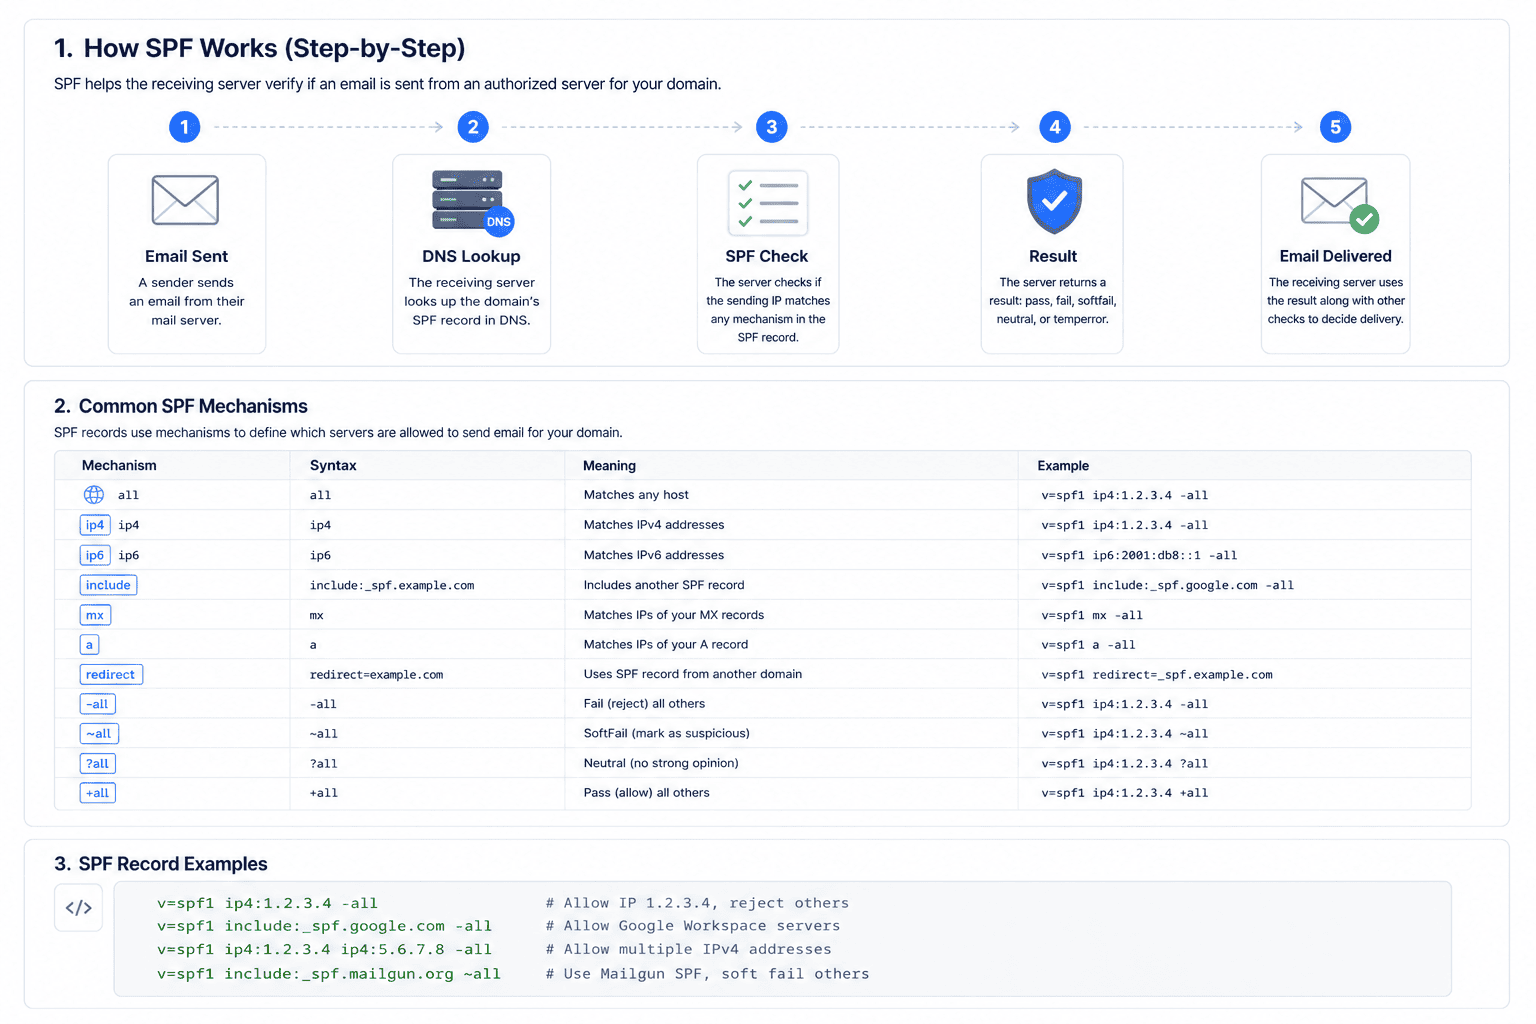
2. How SPF Records Work (Step-by-Step Process)
 To understand why emails sometimes land in spam or get rejected, it helps to see what happens behind the scenes.
1. The Email Is Sent
When you send an email (via Google Workspace, Outlook, or other platforms), your mail server includes:
- The sending server’s IP address
- The domain it claims to represent
This is the starting point of the SPF validation process.
2. DNS Lookup
The receiving server (like Gmail or Yahoo) checks your domain’s DNS.
It looks for a TXT record that starts with:
v=spf1If no SPF record exists, the message is more likely to be flagged as spam.
3. SPF Record Evaluation
Here’s an example of a real SPF record:
v=spf1 ip4:192.0.2.1 include:_spf.google.com mx ~allThe receiving server evaluates whether the sender matches the allowed rules:
- ip4 / ip6 → Is this IP allowed?
- include → Is a trusted service authorized?
- a / mx → Are your domain servers allowed?.
This step determines whether the email is legitimate or potentially spoofed.
4. SPF Result (Final Decision)
The server assigns a final result, which is added to the email headers:
- Pass → Authorized → Delivered to inbox
- Fail (-all) → Unauthorized → Rejected or bounced
- Softfail (~all) → Suspicious → Usually sent to spam
- Neutral (?all) → No strict policy → Treated as uncertain
What I fixed (important)
- Removed duplicate title
- Fixed broken formatting
- Separated paragraphs (huge for readability)
- Improved sentence flow (less robotic)
- Made it scannable (Google prefers this)
- Added natural keyword placement (not forced)
Want to Go Deeper? Understand SPF Syntax (Advanced Guide)
If you already understand the basics of how SPF works and want to take full control of your email authentication setup, the next step is learning how SPF records are actually built.
SPF records follow a strict syntax that defines how mechanisms like ip4, include, mx, and qualifiers such as ~all or -all work together.
👉 Read the full advanced guide here: SPF Record Syntax Explained: A Practical Guide (With Real Examples)
This guide will help you:
Understand SPF mechanisms in depth Learn how include chains work Avoid DNS lookup limit errors (10 lookup rule) Fix common SPF syntax mistakes like permerror Build production-ready SPF records for real email systems
Conclusion
SPF records are essential for protecting your domain from email spoofing and improving deliverability, but they work best when combined with DKIM and DMARC.
To go further, read our DKIM guide and use the NextlyTools DNS Lookup Tool to quickly verify your DNS records and ensure your email setup is fully secure and properly configured.